Tuesday, January 17, 2017

Basic Dynamic Range Compressor

My last post described the need for dynamic range compression in hearing aids: if you amplify enough to hear quiet sounds, loud sounds will become too loud.  One solution is to include a Dynamic Range Compressor (DRC), which changes the gain depending upon the loudness of the signal.  Because of the DRC, loud sounds will be amplified less than quiet sounds.  Perfect!  In this post, I describe how I implemented a DRC and I show its effect on some simple signals.

Algorithm Overview:  In the figure above, I illustrate the basic signal flow through my DRC algorithm.  It's a feed-forward design with a side-chain that computes the time-varying amount of gain that should be applied.  The function of each block is described below:
  • Pre-Process Signal:  In this block, I apply the "pre-gain", which is the amount of gain that will be applied when the compressor is in its linear regime.  Also in this block, I use a high-pass filter to remove any DC offset in the audio signal.
  • Level Estimator:  For the compressor to vary the gain based on the loudness of the signal, it needs to first estimate the loudness of the signal.  That's what this block does.
  • Gain Calculator: Using the estimated loudness, this block calculates how much to reduce the gain of the system.  It calculates the desired gain reduction knowing the "compression ratio" and "compression threshold" that have been supplied by the user.  It also smooths the compressed gain value through time via "attack" and "release" time constants that have been supplied by the user.
  • Apply Gain: Once the desired compressed gain value has been calculated by the side-chain, this block applies the gain to the audio signal.
Arduino/Teensy Implementation:  I implemented this algorithm as an C++ class that can be called from any Arduino or Teensy program (see AudioEffectCompressor_F32 in my GitHub library here). It is built upon my F32-extension of the Teensy Audio Library.  Because it is so reliant on floating-point operations, it is probably only appropriate for use on the Teensy 3.5 or 3.6 (which have floating-point hardware support) and not the older 3.0, 3.1, or 3.2.


Algorithm Parameters:  In the signal flow diagram below, I show the algorithm parameters that are available for the user to set.  The main tricky part is how to set the time constant for the Level Estimator.  By default, I have this value always scale itself to be 20% of the time constants that the user has set for the Gain Calculator block.  If you don't like this default behavior, you can specify your own value using the method setLevelTimeConst_sec().

Example Sketch:  As part of including this DRC algorithm in my OpenAudio_ArduinoLibrary (GitHub page here), I made sure to include an example sketch called BasicCompressor_Float.  This example code assumes that you have a Teensy Audio Board along with a Teensy 3.5/3.6.  Within the code, there are a couple of options:

  • USB Audio:  For my testing, I chose to send and receive audio over the USB link, instead of via analog audio cables.  See this post, if you want more info on how to use the Teensy's USB Audio link.  To enable USB audio in this sketch, set DO_USB to a value of one.
  • Fast or Slow:  Another choice is how to set the values for the compressor's parameters.  In my example, I have two sets of parameters.  One set gives a "fast" compressor response that is appropriate for quick limiting of very loud sounds.  The other set of values gives a "slow" response that can be used as a automatic volume control.  For my testing, I chose to use the "fast" response, as shown below.


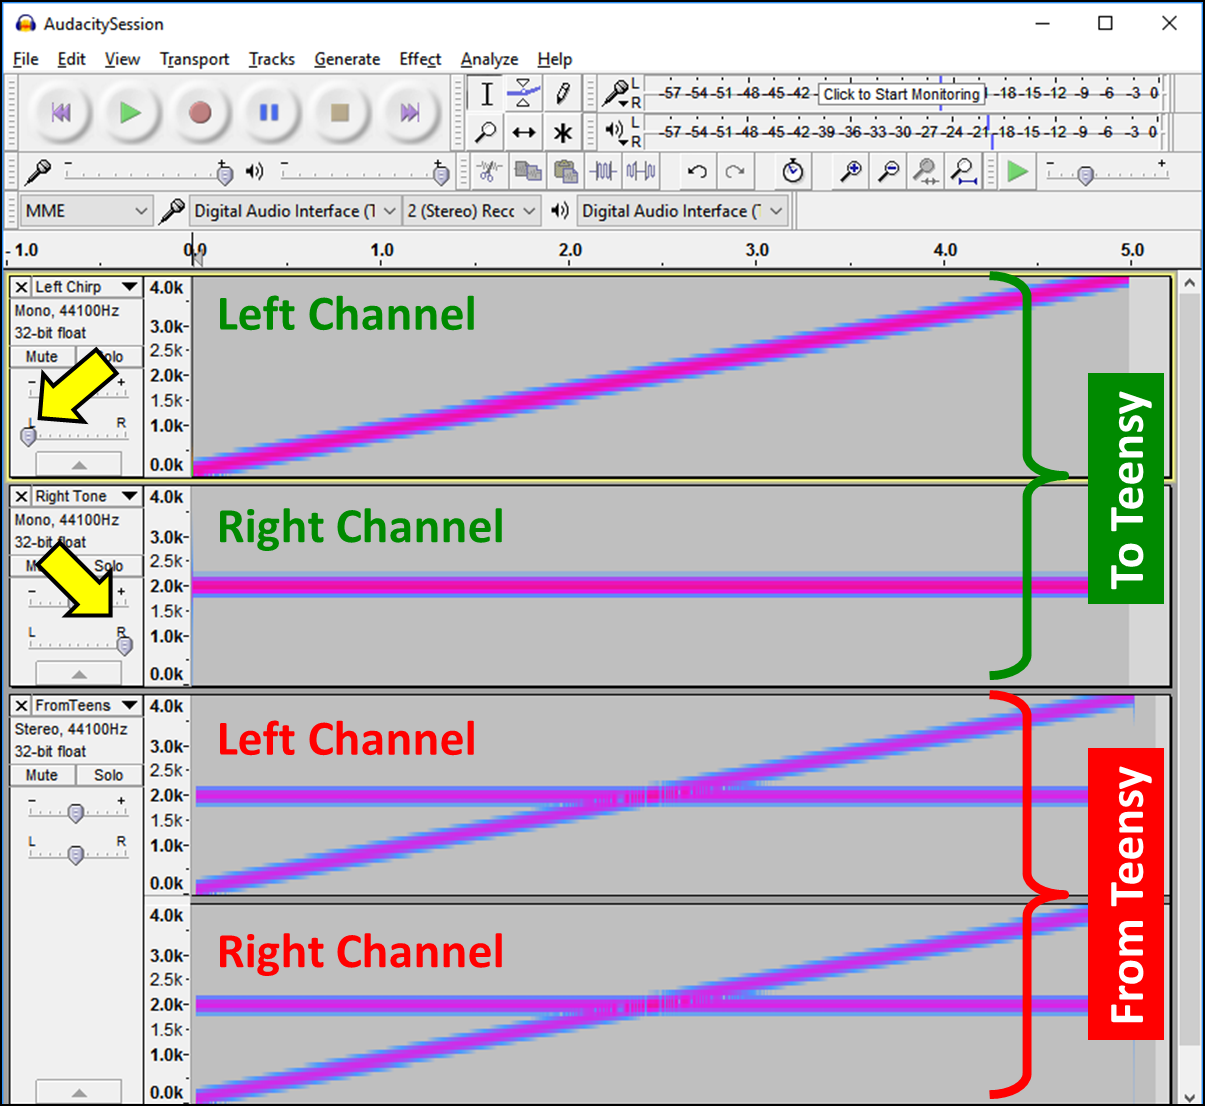
Test Setup:  For my testing, I'm using my breadboard prototype of my Teensy Hearing Aid, which is just a Teensy 3.6 with the Teensy Audio Board (plus microphones, battery, and Bluetooth module, which are not relevant to this test).   I've got it plugged into my laptop via USB, which is also used to send and receive audio to the Teensy via the Teensy's ability to do USB Audio.  On my laptop, I'm using the Arduino IDE to set the compressor's parameters (again, I'm using the "fast" configuration) and I'm using Audacity to send the audio to the Teensy and to record the audio returned by the Teensy.


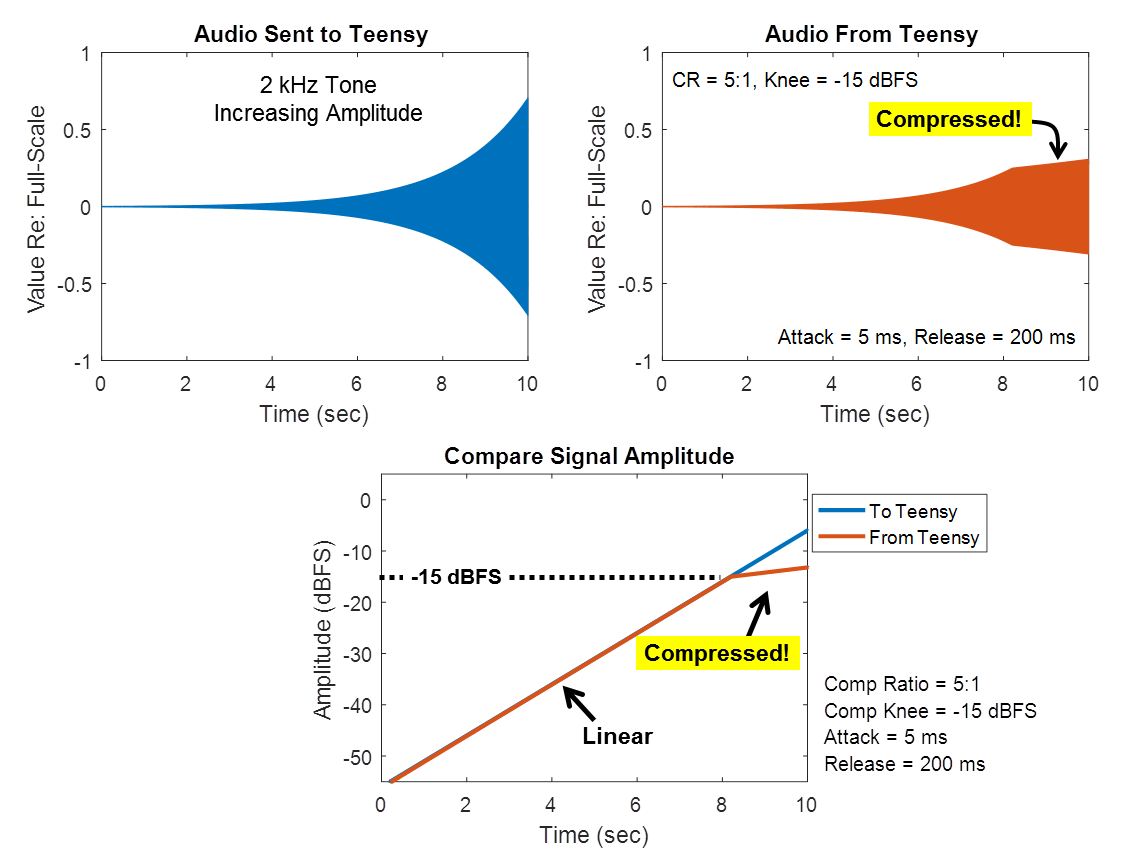
Testing, Amplitude Sweep:  For my first test, I generated a steady 2kHz tone whose amplitude increases from quiet to loud at a rate of about 6 dB/sec (my test signals are shared here).  This is the signal that I'm sending to the Teensy (also shown in blue in the figure below).  When sending this signal, the compression algorithm on the Teensy returns the signal shown in orange.  If you look at the loudest portion of the audio (starting around time = 8 seconds) the amplitude of the orange output signal looks to be squashed compared to the blue input signal.  This is the effect of the compressor!  It successfully reduced the dynamic range of the audio, as intended.

Quantifying the Response:  One important question is whether the compressor kicked in at the correct amplitude.  To answer this question, I assessed the instantaneous amplitude of each signal, as shown in the bottom plot in the figure above.  It clearly shows that the compression of the output signal begins at an amplitude that is 15 dB below full-scale.  This is exactly the value that was specified in the example code by the call to setThresh_dBFS().  It is pleasing to see that the algorithm works as intended.

Testing, Step Changes in Amplitude:  Another important question is whether the compressor is responding at the correct speed to changes in signal amplitude.  To answer this question, I generated a test signal with instantaneous step changes in amplitude, as shown in blue in the figure below.  The compressor's response is shown in orange.
Quantifying the Attack and Release:  When I extract the amplitude of each signal versus time (bottom plot), you can see that the compressor lags in its response to the step changes.  When the input signal gets louder (say, at time = 2 sec), the compressor's 5 msec "attack" time constant allows the compressor to response very quickly.  But, when the input signal gets quieter (say, at time = 3 sec), the compressor's 200 msec "release" time constant makes it respond more slowly.  In my code, these time constants are used in the traditional sense of "time constant", meaning that 63% of the change (in dB) is achieved in one time constant.  Based on the figure above, it appears that my compressor is responding at the correct speed.  I'm pleased.

Next Steps:  With the dynamic range compressor working correctly (and sounding pretty good when used with my Teensy Hearing Aid's microphones and my headphones), I'm well on my way to completing the signal processing hardware and software for a very basic hearing aid.  The main component that I'm still missing is some sort of frequency compensation to increase the gain on the frequencies that the listener needs to hear better, while reducing gain on those frequencies that the listener already hears well enough.  Stay tuned!

Follow-Up:  This algorithm converts to dB and back.  When doing the log10(x) and pow(10,x), be sure to call the correct versions and they'll run *much* faster.  Check it out here.

Saturday, January 14, 2017

The Need for Dynamic Range Compression

Sitting at an airport for any length of time, you quickly get a sense for how uncomfortable even a moderately loud environment can become.  At first, you can ignore the noise, but it quickly becomes grating and fatiguing and makes you irritable. A similar problem is faced by many hearing aid users. If you’ve got a hearing loss, how do you make quiet sounds loud enough to hear without also making already-loud sounds too uncomfortable?  For hearing aids, the answer is “dynamic range compression”.

If you have normal hearing, you can hear sounds over a wide range of loudness. To illustrate this point, the figure below shows the loudness for a few common sounds: from a whisper up to a table saw.  Quieter than a whisper, sounds start to become too quiet to hear. Around the loudness of a table saw, sounds are so loud that they become very uncomfortable (and also dangerous to your hearing). Between these two extremes, is one's usable dynamic range.  For a person with normal hearing, it might span over 100 dB.  It’s an impressive human capability.
If you have a hearing loss, you might not have this much range.  As shown in the figure below, if you have a hearing loss, your threshold for “too quiet” moves upward.  You can no longer hear hear really quiet sounds.  With a 40 dB hearing loss, you’ll likely lose the ability to hear whispering.  Worse, even normal conversation might feel quiet enough such that it requires a lot more effort to follow.  Losing the ability for easy conversation is when hearing loss really starts to affect one's quality of life.  Or, it's when you start blaming everyone for "mumbling too much".
Hearing loss is complicated, however.  It can affect your perception of quiet sounds differently than your perception of loud sounds. Your sensitivity to quiet sounds might have decreased by 40 dB, but your sensitivity to loud sounds might not have changed at all.  So, despite your hearing loss, that table saw might still feel uncomfortably loud.  The result is that your hearing loss has decreased your usable dynamic range.  You live in a narrower acoustic world.

Historically, this decreased dynamic range was a real challenge when fitting a hearing aid. If you configured a hearing aid to sufficiently amplify quiet sounds, loud sounds could end up feeling way too loud.  As an example, the figure below shows the effect of an old-fashioned linear hearing aid providing a uniform 30 dB of amplification to all sounds. As you can see, the whisper is now loud enough to be heard.  Great!  But, now look at the high end -- the uniform amplification has made the lawn mower and the table saw painfully loud.  Even a busy restaurant is perhaps loud enough to be fatiguing and difficult over time. This is very common struggle that people with hearing loss face.
One approach used by hearing aid developers to make smarter hearing aids that fully amplify quiet sounds, while providing less amplification for louder sounds.  In effect, this approach compresses the dynamic range of the sounds presented in the ear.  As a result, these are called "compression" hearing aids.  The figure below illustrates the behavior of a hearing aid configured for 30 dB of gain with a 2:1 compression ratio that is applied for any sound with an amplified volume of 70 dB.  You can clearly see the "kink" in the line where the dynamic range compression kicks in.
Because of the dynamic range compression, the whisper is loud enough to hear while the restaurant, lawn mower, and table saw stay at reasonable volumes.  This is exactly what we want!  Isn’t it great that we’ve just solved everyone’s hearing problems?

Of course, hearing loss isn’t this simple.  Dynamic range compression does not solve all of the problem of hearing loss.  But, it is a very important tool and is central to most hearing aid algorithms.  So, in a follow-up post, I’ll implement a simple dynamic range compressor for my Teensy Hearing Aid.  The compressor will be a key part of its functionality.

Oh, back to the airport.  When you’re killing time in the airport taking pictures for your blog post, it might occur to you that all of the other travelers can see you making your silly faces for “Too Quiet!” and “Too Loud!”.  Such a realization might give you the giggles.  You have been warned.

[Photo Credit: Blue Memo Productions]
Follow-Up:  I've implemented a basic dynamic range compressor.  Check it out here!

Monday, January 2, 2017

Received My First Pull Request!

After my post about my floating-point extension of the Teensy Audio Library, I received my first Pull Request!  Someone besides me is working on the library, and that is such a complement.  Thanks, @patrick-radius!


Converting Existing Blocks to F32:  For his first contributions, Patrick created AudioMixer4_F32 and AudioMultiply_F32.  His approach was to take blocks from the existing Teensy Audio Library (their GitHub is here) and create F32 versions.  Since many people are already familiar with the Teensy Audio Library, this is a great approach for quickly adding more floating-point capability to the library (and to your own project!).

Suggestions:  If you want to make your own contributions to this floating-point library, I'd be very happy to receive them.  Like Patrick, following the model of the Teensy Audio Library is a great approach.  You could follow both the conventions as well as the style of the Teensy Audio Library.  The primary convention that is different with my F32 library is that:
  • Full-scale for the floating-point algorithms is +/-1.0 instead of +/-32768.  So, if you are copying algorithms from the Teensy Audio Library, you don't need to include scale factors or gain limits with values such as 32768 or 255 or 127.
Furthermore, if you want to contribute to my library, may I suggest that you be sure to:
  • In your *.h file, include a comment block at the top that identifies the name of the class and you as the creator.  For an example of such a header, see AudioEffectGain_F32.h.
  • Once your class works, be sure to put an #include for your *,.h file into the library's overall header file: OpenAudio_ArduinoLibrary.h.  Also, add your class as a keyword in keywords.txt.
Example Sketch:  When contributing audio blocks, consider making an example sketch so that I (and others) can see how it works.  Your example sketch should go in the examples directory of this library.  

Stereo to Mono Example:  Patrick did not include an example sketch with his contributions, so I made one.  I made an example using his   My example,  MixStereoToMono_Float, uses his new AudioMixer4_F32 class to take a two-channel (ie, stereo) input and mix them into a single-channel (ie, mono) output.  By including such an example, a new person can see how to use your new audio processing block.

Testing Using Audacity:  To test my example sketch, I used Audacity to generate some test audio and to send the audio to my Teensy 3.6 via the Teeny's USB audio connection.  For my test audio, I created an upward sweeping chirp for the left channel and I created a steady 2 kHz tone for the right channel.  In the screenshot below, the yellow arrows point to the panning controls that I used to force my audio into the left and right channels.


Result:  Hitting the record button, Audacity played the stereo audio out to the Teensy while simultaneously recording the audio being output by the Teensy.  As you can see, the audio produced by the Teensy was the mixture of the left and right inputs.  Success!

Many Thanks:  I'm so appreciative for Patrick's high-quality contributions to this library.  Many, many thanks.  And, from him or from anyone elese, I greatly look forward to additional Pull Requests!