Saturday, January 14, 2017

The Need for Dynamic Range Compression

Sitting at an airport for any length of time, you quickly get a sense for how uncomfortable even a moderately loud environment can become.  At first, you can ignore the noise, but it quickly becomes grating and fatiguing and makes you irritable. A similar problem is faced by many hearing aid users. If you’ve got a hearing loss, how do you make quiet sounds loud enough to hear without also making already-loud sounds too uncomfortable?  For hearing aids, the answer is “dynamic range compression”.

If you have normal hearing, you can hear sounds over a wide range of loudness. To illustrate this point, the figure below shows the loudness for a few common sounds: from a whisper up to a table saw.  Quieter than a whisper, sounds start to become too quiet to hear. Around the loudness of a table saw, sounds are so loud that they become very uncomfortable (and also dangerous to your hearing). Between these two extremes, is one's usable dynamic range.  For a person with normal hearing, it might span over 100 dB.  It’s an impressive human capability.
If you have a hearing loss, you might not have this much range.  As shown in the figure below, if you have a hearing loss, your threshold for “too quiet” moves upward.  You can no longer hear hear really quiet sounds.  With a 40 dB hearing loss, you’ll likely lose the ability to hear whispering.  Worse, even normal conversation might feel quiet enough such that it requires a lot more effort to follow.  Losing the ability for easy conversation is when hearing loss really starts to affect one's quality of life.  Or, it's when you start blaming everyone for "mumbling too much".
Hearing loss is complicated, however.  It can affect your perception of quiet sounds differently than your perception of loud sounds. Your sensitivity to quiet sounds might have decreased by 40 dB, but your sensitivity to loud sounds might not have changed at all.  So, despite your hearing loss, that table saw might still feel uncomfortably loud.  The result is that your hearing loss has decreased your usable dynamic range.  You live in a narrower acoustic world.

Historically, this decreased dynamic range was a real challenge when fitting a hearing aid. If you configured a hearing aid to sufficiently amplify quiet sounds, loud sounds could end up feeling way too loud.  As an example, the figure below shows the effect of an old-fashioned linear hearing aid providing a uniform 30 dB of amplification to all sounds. As you can see, the whisper is now loud enough to be heard.  Great!  But, now look at the high end -- the uniform amplification has made the lawn mower and the table saw painfully loud.  Even a busy restaurant is perhaps loud enough to be fatiguing and difficult over time. This is very common struggle that people with hearing loss face.
One approach used by hearing aid developers to make smarter hearing aids that fully amplify quiet sounds, while providing less amplification for louder sounds.  In effect, this approach compresses the dynamic range of the sounds presented in the ear.  As a result, these are called "compression" hearing aids.  The figure below illustrates the behavior of a hearing aid configured for 30 dB of gain with a 2:1 compression ratio that is applied for any sound with an amplified volume of 70 dB.  You can clearly see the "kink" in the line where the dynamic range compression kicks in.
Because of the dynamic range compression, the whisper is loud enough to hear while the restaurant, lawn mower, and table saw stay at reasonable volumes.  This is exactly what we want!  Isn’t it great that we’ve just solved everyone’s hearing problems?

Of course, hearing loss isn’t this simple.  Dynamic range compression does not solve all of the problem of hearing loss.  But, it is a very important tool and is central to most hearing aid algorithms.  So, in a follow-up post, I’ll implement a simple dynamic range compressor for my Teensy Hearing Aid.  The compressor will be a key part of its functionality.

Oh, back to the airport.  When you’re killing time in the airport taking pictures for your blog post, it might occur to you that all of the other travelers can see you making your silly faces for “Too Quiet!” and “Too Loud!”.  Such a realization might give you the giggles.  You have been warned.

[Photo Credit: Blue Memo Productions]
Follow-Up:  I've implemented a basic dynamic range compressor.  Check it out here!

Monday, January 2, 2017

Received My First Pull Request!

After my post about my floating-point extension of the Teensy Audio Library, I received my first Pull Request!  Someone besides me is working on the library, and that is such a complement.  Thanks, @patrick-radius!


Converting Existing Blocks to F32:  For his first contributions, Patrick created AudioMixer4_F32 and AudioMultiply_F32.  His approach was to take blocks from the existing Teensy Audio Library (their GitHub is here) and create F32 versions.  Since many people are already familiar with the Teensy Audio Library, this is a great approach for quickly adding more floating-point capability to the library (and to your own project!).

Suggestions:  If you want to make your own contributions to this floating-point library, I'd be very happy to receive them.  Like Patrick, following the model of the Teensy Audio Library is a great approach.  You could follow both the conventions as well as the style of the Teensy Audio Library.  The primary convention that is different with my F32 library is that:
  • Full-scale for the floating-point algorithms is +/-1.0 instead of +/-32768.  So, if you are copying algorithms from the Teensy Audio Library, you don't need to include scale factors or gain limits with values such as 32768 or 255 or 127.
Furthermore, if you want to contribute to my library, may I suggest that you be sure to:
  • In your *.h file, include a comment block at the top that identifies the name of the class and you as the creator.  For an example of such a header, see AudioEffectGain_F32.h.
  • Once your class works, be sure to put an #include for your *,.h file into the library's overall header file: OpenAudio_ArduinoLibrary.h.  Also, add your class as a keyword in keywords.txt.
Example Sketch:  When contributing audio blocks, consider making an example sketch so that I (and others) can see how it works.  Your example sketch should go in the examples directory of this library.  

Stereo to Mono Example:  Patrick did not include an example sketch with his contributions, so I made one.  I made an example using his   My example,  MixStereoToMono_Float, uses his new AudioMixer4_F32 class to take a two-channel (ie, stereo) input and mix them into a single-channel (ie, mono) output.  By including such an example, a new person can see how to use your new audio processing block.

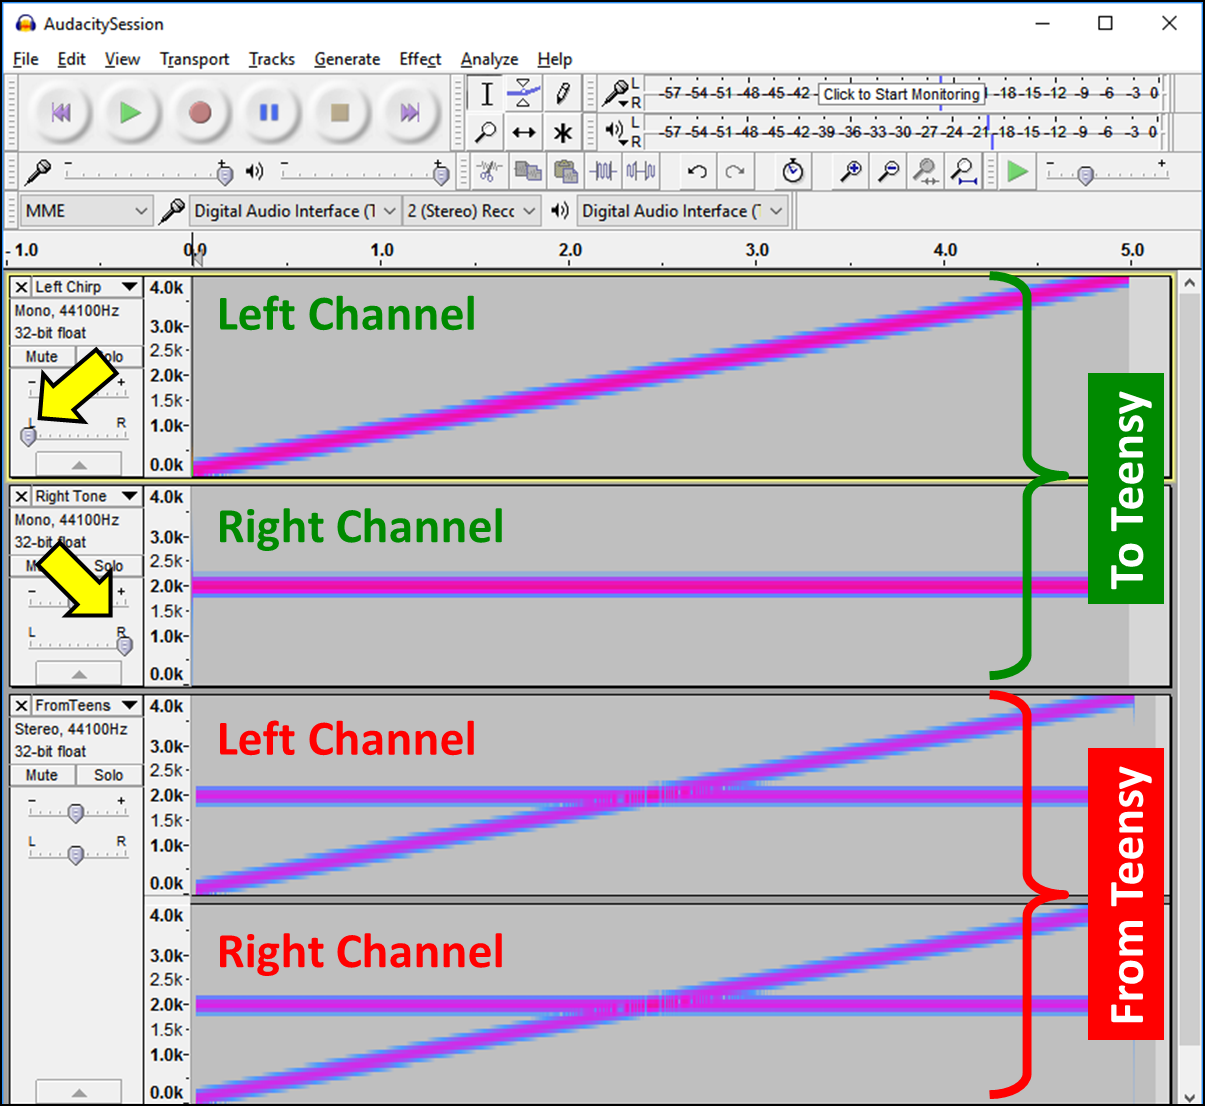
Testing Using Audacity:  To test my example sketch, I used Audacity to generate some test audio and to send the audio to my Teensy 3.6 via the Teeny's USB audio connection.  For my test audio, I created an upward sweeping chirp for the left channel and I created a steady 2 kHz tone for the right channel.  In the screenshot below, the yellow arrows point to the panning controls that I used to force my audio into the left and right channels.


Result:  Hitting the record button, Audacity played the stereo audio out to the Teensy while simultaneously recording the audio being output by the Teensy.  As you can see, the audio produced by the Teensy was the mixture of the left and right inputs.  Success!

Many Thanks:  I'm so appreciative for Patrick's high-quality contributions to this library.  Many, many thanks.  And, from him or from anyone elese, I greatly look forward to additional Pull Requests!

Sunday, December 4, 2016

Extending Teensy Audio Library for Floating-Point

For my Teensy-based hearing aid, it will be much easier to program new audio processing algorithms if I can use floating-point aido data instead of fixed-point audio data.  Unfortunately, the Teensy Audio Library assumes the use fixed-point data types (ie, Int16) for all of its processing blocks.  So, I decided to extend that library to enable the floating-point processing that I want.  Here's an overview of how I made it work.  My "OpenAudio" library is available on my GitHub here.  I'd love any feedback (or GitHub pull requests!) on how it could be done better.
Teensy Audio Library Assumes Int16:  My goal has been to maintain as much of the Teensy Audio Library's structure as possible.  But, many of the core elements of the Teensy Audio Library are deeply entwined with the assumption of fixed-point Int16 audio data.  Shown in red in the figure above are several of the foundational elements of the Teensy Audio Library that are tied to Int16 audio data.  These are the elements that I extended.

OpenAudio F32 Versions:  To enable Float32 operations, I wrote new Float32 versions of these elements.  I used inheritance where possible to reduce the duplication of functionality, particularly for the AudioStream to AudioStream_F32 conversion.  To maintain the structure and conventions of the Teensy Audio Library, I made a one-for-one replacement so that one only need to substitute the "_F32" version for the standard version.

Conversion Routines:  To interface between the Int16 data of the Teensy Audio Library and the Float32 data used my extended library, I also wrote two new "AudioConvert" classes.  In addition to converting between the Int16 and Float32 data types, these routines also re-scale the data.  The Teensy Audio Library assumes "full scale" is ±32768 whereas my floating-point objects assume that ±1.0 is full scale.  My conversion routines automatically account for this difference.

OpenAudio F32 Example:  If you download the library and unzip it into your Arduino Libraries directory (see "Installation" notes here), you can start the Arduino IDE and load an example sketch that comes with the library.  Go under the "File" menu and select "Examples", then, "OpenAudio_ArduinoLibrary", then "BasicGain_Float".


Add a New #include:  Inside this sketch, you'll see many features that are similar to every sketch that uses the Teensy Audio Library.  For example, the screenshot below shows the #include statements at the beginning of the sketch.  Note that I added an #include for the new OpenAudio library.  Once this line is added, any of the new OpenAudio classes can be used.


Instantiate the New Classes:  In a typical sketch using the Teensy Audio Library, the next block of code instantiates the audio-related objects.  The screenshot below illustrates this by invoking the standard AudioControlSGTL5000, AudioInputI2S, and AudioOutputI2S classes.   After these standard lines, I added three new lines that instantiate blocks for floating-point processing.


In this case, AudioConvert_I16toF32 will convert the standard Int16 audio data to float32.  AudioEffectGain_F32 will apply gain to the float32 audio data.  AudioConvert_F32toI16 will convert the audio data back to Int16 so that it can be output by the usual functions of the Teensy Audio Library.

New Audio Connections:  After instantiating the objects, the next step is to make the audio connections between the objects.  The screenshot below shows that a mix of standard (Int16) connections and new (Float32) connections are used to make the full processing chain.  The standard connections (AudioConnection) are used whenever the data being passed is Int16 data.  The new connections (AudioConnection_F32) are used whenever the data is float32 data.


Allocate Float32 Memory:  The last step is shown in the screenshot below.  In the setup() function is where memory is allocated for the Teensy Audio Library via the AudioMemory() statement.  Following this same pattern, I added the AudioMemory_F32() statement to allocate the float32 memory that is needed for the floating-point processing.


Complie and Run:  If you have a Teensy 3.5 or 3.6 and a Teensy Audio Board, you can compile and run this example sketch.  If you have a potentiometer attached to the Teensy Audio Board's volume control, you can use the pot to adjust the volume of the sound (well, it actually adjusts the gain applied by the new floating-point gain block).  On my hardware, it works great!  Hopefully it works well on yours, too.

Next Steps:  With the floating-point audio processing structure in-place, I can move forward with adding more "F32" processing blocks for the different functions that I need.  My next block will be a dynamic range compressor.  Then I'll probably add a filtering block.  Eventually, I'll be looking to add frequency-domain processing, which will likely involve extending my library again for a "complex_float32" data type.  That'll be even more fun!

Update:  I had my first Pull Request with a user contribution.  So awesome!
Update:  I've added an algorithms: a basic Dynamic Range Compressor.

Tuesday, November 29, 2016

Teensy Audio Board Headphone Level

For my home-brew Teensy Hearing Aid, I'm using the Teensy Audio Board as my audio interface.  The heart of the Teensy Audio Board is the Freescale SGTL5000 stereo codec.  This codec is very flexible, with lots of virtual knobs for tuning your system to suit your own application.  For my hearing aid, it is important for me to understand all settings related to loudness.  So, today, I'm going to look at the impact of the headphone volume control.


System Block Diagram:  The figure above is taken from the datasheet for the SGTL5000.  All of the blocks in yellow  are analog gain stages.  The headphone volume control is at the end of the chain, on the upper right.  It says that the headphone volume can be adjusted from -52 dB to +12 dB.

Teensy Audio Library:  Because this SGTL5000 is embedded within the Teensy Audio Board, I control it via the Teensy Audio Library.  The library hides many of the details of controlling the SGTL5000.  For example, it allows the user to control the headphone volume simply by commanding a value somewhere between 0.0 and 1.0.  Presumably, 0.0 maps to the -52 dB setting and 1.0 maps to the +12 dB setting.

Measuring the Response:  To see what this means for my system, I wrote a sketch for the Teensy that uses the Teensy Audio Library to continuously generate a nearly full-scale sine wave and to output it via the headphone jack (code is shared here).  The volume setting for the headphone output is controlled via potentiometer on the Teensy Audio Board.  To see the effect of the headphone volume setting, I measured the RMS voltage produced at the headphone jack using a Fluke handheld digital multi-meter.


Results:  The figure above shows the values that I measured.  As can be seen, the response in the middle section is linear, which is great.  At the low end, my results do deviate from linear, but that's presumably because my multi-meter had difficulty measuring such small signals (-50dBV is only 3.2 mVrms!).

Saturation:  The interesting result happens at the high end of my graph where I turn up the volume control to its highest values.  Here, my results saturate -- increasing the volume command does not increase the output voltage.  The break-over point is at a command of about 0.85.  This corresponds to an output signal level of +1.5 dBV, which is 1.2 Vrms, which is 3.4 Vpk-pk.  Since the power supply to the SGTL5000 is only 3.3V, it is not surprising that the output saturates when I ask for the output signal to be greater than the power rails.

Best Setting to Use:  Saturation will sound bad.  It will cause distortion in the audio.  To keep my hearing aid sounding good, I want to avoid this saturation.  If my full-scale sine wave causes saturation at a volume setting of 0.85, I am going to set my volume to 0.8.

Saturday, November 26, 2016

Reducing Current Draw

My previous post introduced my Teensy-based hearing aid.  While my primary goal was to make a platform for developing audio processing algorithms, I am interested in exploring its performance as an actual hearing assistive device.  From this viewpoint, battery life is important.  In assembling my device, however, I gave no thought to minimizing power consumption.  Does it draw too much current?  Will it have a usable battery life?  Let's find out!


Initial Measurements:  With my baseline Teensy Hearing Aid, I measuring the current being drawn from the battery during normal operation.  At this early stage of development, the Teensy isn't doing very much -- it is simply applying digital gain to the audio stream.  Because it is doing so little, I am hoping that we'll see the lowest power consumption.  My results are below.  Note that I measured the power consumption across a range of processor speeds.  You can set the speed of the processor via the Arduino IDE when you compile the sketch.


That's A Lot of Current!  I was surprised to find that at its normal speed (180 MHz) the system was drawing almost 91 mA of current.  That's a lot of current.  My battery has a capacity of 350 mA-hours, so my battery life will only be about (350 mA-hrs / 91 mA) = 3.8 hours.  For a "hearing aid", this is pretty short.  Yes, I could slow down the processor to reduce my power consumption, but this is an inelegant solution that requires me (the programmer) to ensure that my software will always live happily within the limits of the slower speed.  I'd prefer a more dynamic approach, where the code itself will switch between low-power and high-performance modes as the workload demands.  I don't know how to do that.

Sleep During Idle:  Luckily, I have a friend who is experienced with low power embedded systems.  He suggested that I could save a lot of power by putting the processor to sleep during idle periods.  Knowing that I'm working with an ARM processor (the heart of the Teensy board), he suggested that I insert the ARM-specific command asm(" WFI") into my main loop (yes, you do need the space before the W).  When the processor hits this command, it'll go to sleep and consume less power.  It'll stay asleep and "Wait For Interrupt" (hence "WFI") before waking to resume its work.


Wait for Interrupt:   Since I don't want it to sleep forever, I need to make sure that there is an interrupt (such as a timer) that'll wake the system periodically so that it can do its work.  As I don't know how to do this, I have a problem.  Luckily, I know that the Teensy Audio Library already uses interrupts to do its work.  I know that it fires at least one interrupt every 128 audio samples.  As any interrupt will trigger the WFI to wake up, I don't need to do anything more.  I can just add the WFI command and rely upon the Audio Library to wake the system.  The system will automatically go back and forth between sleep and wake.  One line of code -- what a simple solution.

It Works!  After adding the WFI command (my code is here), I measured the current draw again.  The WFI command works!  At the default speed of 180 MHz, the system now draws only 57 mA, instead of 91 mA as seen before.  That's a 34 mA savings with no impact on system performance.  Fantastic.


Battery Life:  By adding the WFI command, power consumption has dropped to 2/3 of its original value.  My system will now have 50% more battery life.  Using my 350 mA-hr battery, I'll now get 6 hours of life instead of 4 hours.  That's a great improvement for adding just a single line of code.


More Power Savings?  While increasing my battery life by 50% is great, I went back to my friend asking if more savings could be had so easily.  He said that I could save more power, but not nearly as easily.  He said that the next step would be to identify and disable peripherals that I don't need.  But, to do this, I'd have to read through and understand my processor's datasheet, which is not an easy task for a newbie such as myself.  So, for now, I think that I'll be content with the easy savings provided by the WFI command.

For Fellow Nerds...My Raw Data:  For anyone who is really interested, my raw data is in the table below (or here).  It is interesting that, even at very slow processor speeds, I still see power savings when using the WFI command.  Clearly, my "Gain Only" audio processing algorithm requires very little effort from the processor.  That Teensy 3.6 sure is fast!


Sunday, November 20, 2016

A Teensy Hearing Aid

Hearing aids are totally closed devices -- their inner workings are hidden.  Access is limited to only those who work for the hearing aid companies.  But if innovation is to accelerate, we need more ideas iterated more quickly.  We need more people to participate in hearing aid development.  But if the devices are closed, there is no way to try new ideas.  So, let's consider the alternative.  Let's try to build an open-source hearing aid.  Yes, at first, an open-source hearing aid will be absurdly big and ugly.  But, you have to start somewhere.  I'm going to start here: take one Teensy microcontroller, add some supporting electronics, and VOILA! A Teensy Hearing Aid!


Basic Hearing Aid Elements:  While it is unfortunate that they are closed devices, real hearing aids are absolutely amazing pieces of technology.  Their minuscule packages are absolutely stuffed with functionality.  I, though, am going to start more simply.  I will start with some microphones, analog and digital converts, a digital audio processor, some speakers, and a battery.  Once this works, I can always add more features later.

Choosing a Processor:  For me, the biggest challenge is always with the software.  Therefore, I need to choose a digital audio processor that it is easy to program.  For me, that means choosing a processor that can be programmed from the hobbyist-friendly Arduino programming environment.  Within that universe of processors, I've chosen to use the Teensy 3.6 because it's fast and because it has a nice audio processing library to make it even easier to program for audio.

Supporting Elements:  To get audio signals into and out of the processor, the Teensy folks offer an inexpensive Audio Adapter Board that mates directly to the Teensy 3.6.  It has the audio ADC and DAC that I need.  For the microphones, I'm using a pair of mic breakout boards from Adafruit.  For speakers, I'm using whatever headphones or earbuds that I might have on-hand.  Finally, for the battery, I'm using a Li-Po battery and Li-Po charger from Adafruit.

Wiring It Up:  The figure above gives an overview of how everything was connected together.  As you can see, the Audio Board is at the center with everything else connecting to it.  The only tricky part of this setup is connecting the battery and charger into the Teensy system.  As indicated on the Teensy pinout diagram, you have to cut a trace on the backside of the Teensy so that you can insert the battery connections.  Once cut, the Teensy's 5V USB voltage goes to the battery charger and the battery's output goes back to the Teensy's "5V" input pin.  Not too bad.


Initial Software:  While this post is primarily about the hardware, I did write some basic software in order to see if the hardware is working (see my GitHub repo).  I used the Teensy Audio Library to configure the Audio Board to pass the "I2S" inputs (ie, my microphones) to the "I2S" outputs (ie, my headphones).  In between, I wrote a simple routine that applies a user-controllable amount of gain to make things louder.  I use the blue potentiometer on the Audio Board to set the amount of gain.

First Audio:  Of course, the first time that I tried to compile the code, my software didn't work.  Does anyone's code ever work the first time?  After some iteration, I finally got it to compile and upload.  Putting on my headphones, I could hear the audio being picked up by the microphones.  Turning the blue pot, I could control its volume.  Hardware knobs are so satisfying.  My favorite part, though, is being able to use the on-board battery so that I can move around freely.  Very fun.


Limitations:  Sure, my home-brewed "hearing aid" is ridiculously large -- no one (including me) would ever wear this around in everyday life.  But, unlike commercially-available hearing aids, my device is open.  Anyone can modify it to make it better.  Anyone can try out their own audio processing algorithms to try to improve one's hearing.  Will any of us beat the professional hearing aid algorithm designers?  Probably not.  But, for me at least, I will surely learn a lot by trying a few of the standard approaches.  And, I'll get to look really cool sharing pictures of myself with this (not so) Teensy Hearing Aid.  Happy hacking!

Follow-Up:  I measured the power consumption of my Teensy Hearing Aid.  Using the "WFI" command, I found a super-easy way to increase the battery life by 50%.  Wow!  See my post here.

Follow-Up:  I measured how the volume control affects the headphone ouput.  See here.

Tuesday, October 25, 2016

Teensy Audio over USB

In my last post, where I sent my first analog audio through a Teensy, I also discovered that it has the ability to exchange digital audio over its USB link.  Whoa.  This means that, if I'm developing some snazzy new audio-processing algorithm, I can test it 100% digitally without adding any complications of converting back and forth through analog signals.  That is a really powerful capability that'll greatly simplify my audio development.  Let's see if it really works!


Discovering USB Audio:  I only discovered that the Teensy might be able to do USB Audio while using their web-based graphical tool.  This is a tool that the Teensy folks ahve created to help people work with their Audio Library.  While using that tool, I noticed that there were input/output blocks named "USB".  Does this mean that Teensy can exchange audio over USB?!?  Really?  That's a pretty advanced feature for an electronics board aimed at hobbyists!  Does it work?

A Simple USB Audio Chain:  To give it a try, I configured an audio chain as shown below: one stereo USB input connected to one stereo USB output.  The left channel is just connected straight across -- no processing.  For the right channel, though, I've inserted a Biquad filter block just so that I can confirm that the Teensy is indeed doing something to the audio.  It's a pretty simple setup.


It Didn't Work:  When I exported the audio chain above, loaded it onto the Teensy, and gave it a try, it didn't work.  I got silence.  I don't know why.  So I started messing around...

Making it Work:  To get the USB Audio to work, I found that I had to engage the audio board's hardware in some way.  One way to make it work is shown below: add a SGTL5000 block for the Audio Board, and add an I2S block to be the output of the Audio Board.  I connected the I2S output to be just like the USB output.  Now, whatever the Teensy is sending out via USB will also be present at the headphone jack.  Sure, it seems like an unnecessary complication if I just want to use USB for my audio, but it's kinda cool that it's so easy to output to multiple targets simultaneously.


Completing the Arduino Code:  The graphical web-based tool shown above doesn't produce a complete program to load onto the Teensy -- it just gets you started.  When I hit the "Export" button, it gave me all of the code to setup the hardware and make the connections, but I still needed to write the last bit of code to make it run.  As usual, I did my coding in the Arduino IDE because it's easiest.

My Code:  The screenshot below shows the Arduino sketch that I used for this demo (it's on my GitHub here).  At the top is the big block of code that was exported from the web-based tool.  Easy.  Then, at the bottom, I added the setup() and loop() functions.  As you can see, the setup() function configures the SGTL5000 audio board and it sets the biquad filter to be a low-pass filter at 500 Hz.  The loop() function does nothing.


Tell the Compiler about USB Audio!  The only trick to using the USB audio is that you need to tell the compiler that you want the Teensy to run in USB Audio mode.  So, prior to compiling and uploading this Arduino sketch, go under the "Tools" menu, click on "USB Type" and select "Audio".  Notice that there are many other choices, including "Serial", "Keyboard, "MIDI", "Audio" and "No USB".   Normally, one uses "Serial" so that Serial.println() is able to print messages to the Serial Monitor.  But, for this demo, I want "Audio".


Loading onto the Teensy:  Once you change the USB setting to Audio, you can compile and upload to the Teensy.  The first time you do it, it'll probably upload to the Teensy without any issue.  Great!  But, once it is in USB Audio mode, future programs won't appear to upload automatically.  Why?  Well, once the USB link set for Audio, the Teensy can't get reprogramming commands over that same USB link.  What's the solution?  After the Arduino IDE has finished compiling, simply press the Teensy's reset button (picture below).  After a reset, the Teensy knows to check in with the PC prior to switching over to Audio mode.  It will automatically get any new program waiting for it.  It's a small extra step, but I didn't find it to be a problem at all.


Testing Using Audacity:  Once the Teensy is in USB Audio mode, the Teensy appears to your PC as if it is a soundcard.  So, you can now send and receive audio data to it using any audio recording program.  For this demo, I used Audacity because it is free.

Configuring Audacity:  With the Teensy attached, my computer now has two soundcards: (1) its built-in soundcard and (2) the Teensy.  Once Audacity launches, I configured Audacity to use the Teensy as the soundcard instead of the built-in one.  The screenshot below shows the five settings that I changed in Audacity.  On my computer (Windows 7), the Teensy cryptically appeared as "Digital Audio Interface (2-Tee" [sic], which wasn't as quite helpful as informative as it could have been, but it was good enough for me to choose the right item.


First USB Audio:  For this test, I'm want to send audio out over USB (to the Teensy) and record audio coming from USB (from the Teensy).  So, I need to start by creating a test signal to send out over USB.  Under the "Generate" menu, I chose "Chirp" and made a linear frequency sweep from 100 Hz to 4000 Hz.  This appeared as a single mono track in Audacity.  That's all the preparation that I needed to do.  Now, I simply hit the red record button.  Audacity started playing out the chirp audio to the Teensy while recording the audio coming back from the Teensy.  The result is shown in the screenshot below.


Success!  The screen shot shows two audio files.  Both files are shown in "spectrogram" view (60 dB dynamic range).  The top file contains the original (mono) frequency sweep generated by Audacity.  This is what was sent to the Teensy over the USB Audio link.  The bottom file shows the stereo audio recorded from the Teensy.  The left channel had no processing being performed by the Teensy and it does indeed appear to be a copy of the original signal.  The right channel, though, was being processed by the Teensy by its 500 Hz low-pass biquad filter.  As can be seen, the high frequencies are attenuated -- the gentle roll-off is as expected from a biquad filter.  This was amazingly easy!

Future Use:  While I'm very impressed that this capability exists at all, it's not perfect.  In additional testing, I occasionally found hiccups or other artifacts in the audio stream coming back from the Teensy.  But, most of the time, this USB Audio link worked really well.  It'll be great for debugging my audio projects.  Anytime I have any question about the negative effects of my analog components, I can simply switch over to USB Audio to avoid the whole problem.  It'll be a great tool to have in my audio hacking toolbox.