Showing posts with label Noise. Show all posts

Monday, November 26, 2018

Microphone Self-Noise (Tympan Rev-D2)

As mentioned in a previous post, it is important for hearing aids that the microphones and electronics have a low self-noise.  Because of the amplification in a hearing aid, what might start as an innocuous amount of noise gets multiplied into a very annoying and fatiguing listening experience.  So, for our next revision of Tympan (Tympan Rev-D2), we're looking to further reduce the self-noise of the system.  We are considering an on-board microphone that should offer 5dB less self-noise than the existing design (Tympan Rev-C).  Instead of taking their word for it, let's place the Tympan mics in a super quiet room and see what happens.


Backstory:  The current release of Tympan is "Rev-C".  It is a fine system, though a bit bulky.  Rev-C is bulky because it is composed of two separate boards: the Teensy 3.6 and the Tympan audio board.  To reduce the bulk, we've smashed them together into one board.  This is our new "Rev-D".  The first version (Rev-D1) is otherwise identical to Rev C -- it has the same on-PCB microphones and the same audio interface.  It appears to have the same performance as Rev-C, which is what we expected.  With that success, we're now trying to further improve the system by focusing on its self-noise.  That's Rev-D2.  For Rev-D2, we're using quieter on-PCB microphones and we've added an additional (hopefully even quieter) pre-amplifier for the mics.  We'll see!

Goal:  Today's goal is to compare the self-noise of the new Rev-D2 to the existing Rev-C/Rev-D1.  We expect to see that D2 is quieter, primarily due to its quieter on-PCB microphones.  From the datasheet specs (below), the proposed mic should offer a significant reduction in self-noise (-5dB) (measured at 1kHz), compared to the existing mic.  While comparing Rev-D2 to Rev-C/Rev-D1, we'll also compare to a laboratory grade reference microphone from B&K.

Design Microphone Mic Sensitivity
dBV/Pa
Self-Noise
(dBA)
Existing Mic
(Rev-C/Rev-D1)
Knowles 
SPH1642HT5H-1
-38 @ 1kHz 29
Proposed Mic
(Rev-D2)
Knowles 
SPM0687LR5H-1
-32 @ 1kHz 24
Reference Mic B&K 4191 -38 @ 250Hz 20


Setup

Approach: The first step is calibrating each Tympan's microphone so that we know how to interpret the recorded audio.  By calibrating each Tympan's microphone, we can express the apparent self-noise levels in terms of apparent sound pressure level (SPL), which is a good way of doing an apples-to-apples comparison across systems.  After we've calibrated the Tympan systems, we'll put the Tympan's into a quiet sound room to (hopefully) measure their self-noise.  Ideally, the ambient noise in the sound room will be low enough to discern the self-noise of the on-board microphones.

Hardware:  We used a Tympan Rev-D1 and a Rev-D2.  We also recorded the ambient sound levels using our laboratory-grade reference microphone, a B&K 4191 along with a National Instruments data acquisition system.   

Gain Settings: In addition to the new microphone on Rev-D2, the Rev-D2 also features a new preamp between the microphone and the Tympan's audio interface chip (a TI AIC3206).  The pre-amp provides about 15 dB of additional gain via an amplifier that we believe to be quieter than the programmable gain in the AIC3206.  Therefore, for the testing with the Rev-D2, we turned down the gain on the AIC3206 by 15 dB, which should make the overall gain between the Rev-D1 and Rev-D2 about the same.  

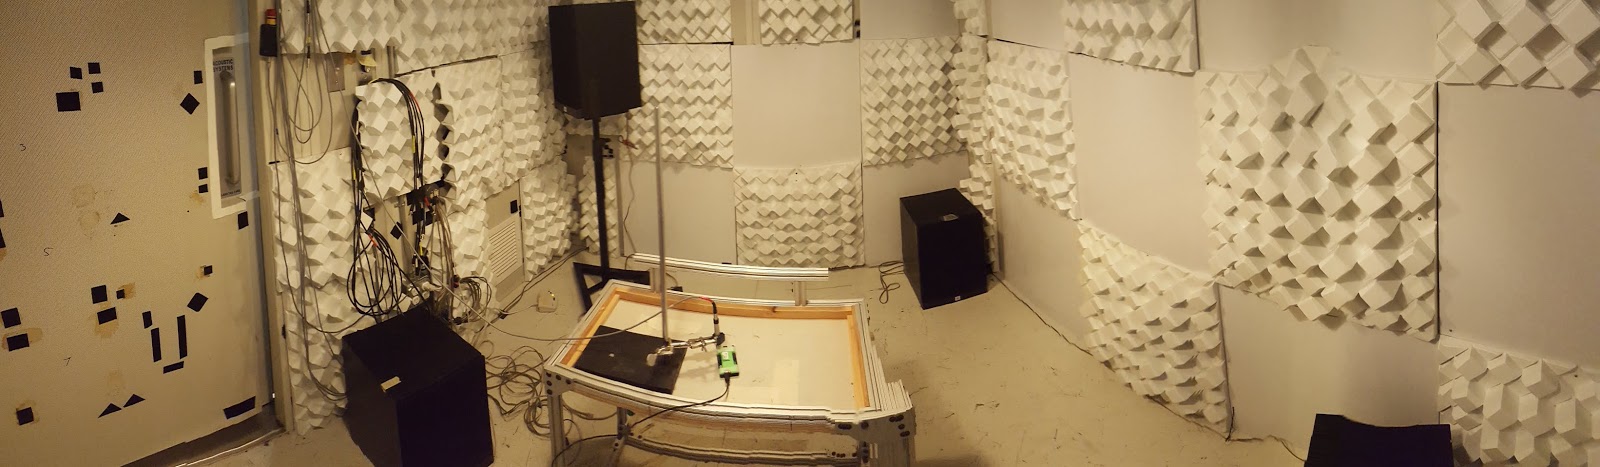
Physical Setup: The sound recordings were made in a single-walled, acoustic test chamber, which is fairly quiet above  125 Hz.  As shown in the figure at the top of this post, the lab-grade B&K microphone was positioned 1" above the Tympan's on-board PCB mic so that it is placed along the same axis as the mic under test.  

Tympan Setup.  The Tympans were configured to record from their on-PCB microphones.  They were configured to use a sample rate of 44.1 kHz and to write their raw audio data straight to the Tympan's SD card.  The Tympan Arduino code is here on GitHub.  The Tympans were running on their battery power.


Calibration

To calibrate the microphones across a wide frequency spectrum (125Hz-22kHz), white noise was created in an audio effects editor and played through 4 speakers in the sound room.  The speakers were pointed in different directions to create a diffuse, rather than directional, sound field.


To define the Tympan's frequency response from 125Hz to 16kHz, the Tympan output was filtered by octave-bands, then the RMS value was taken and converted to a dB log scale that references the Tympan's Full Scale Output (+1.0).


Sensitivity for a digital microphone is often reported as the output at 94dB SPL (i.e. 1 Pa), compared to its full-scale output:

This sensitivity can be rephrased in terms of the dB log scale:

The figure below shows the raw microphone response and the derived sensitivity.  At 1kHz, the proposed microphone (D2) is less sensitivity (-1.8dB) than the existing microphone (D1), which is expected.


Self-Noise

Now that the microphones are calibrated, we can take a recording of a quiet sound room with the mics under test and relate that to an equivalent sound pressure level.  The same analysis was applied as before: the recording was filtered into octave bands then the RMS value was taken for each band.

From the figure below, the proposed mic shows a 1.5dB reduction in self-noise at 1kHz, compared to the existing mic.   We can also report the A-weighted average by applying a correction to the RMS value for each octave band (as described here).  That shows a 1.7dB reduction in A-weighed self-noise.


Conclusion

The self-noise of the proposed microphone offers a small improvement in self-noise (2dB) which is less than that expected from the datasheets (5dB).  As a follow-up, it will be interesting to see if this is due to the thermal noise of the microphone, or self-noise in the front-end electronics.

Wednesday, August 22, 2018

Microphone Self-Noise

A hearing assistive device must not be noisy.  At minimum, noise will be annoying.  At worst, noise will harm, not help a person's ability to hear.  So, for our Tympan device, I want to make sure that it has low self-noise.  In this post, I show how the microphone that you choose can strongly affect the apparent noise of your system.  Spoiler: be careful with lapel mics because they can be very noisy!


Goal:  I want to measure the self-noise of different microphones in combination with the Tympan.

Approach:  My approach is to first calibrate the Tympan when using each microphone.  That way, when comparing between microphones, I'm comparing apples-to-apples.  Once calibrated, I will put the devices in a super-quiet environment and make ambient sound recordings.  The super-quiet environment will probably be so quiet that recordings will reveal the self-noise of the microphones.

Hardware:  As shown in the picture above, I am testing with a Tympan Rev C, which includes built-in microphones (Knowles SPH1642) on its PCB.  I also made recordings with a Sony lapel microphone (ECM-CS10) plugged into the Tympan's microphone jack.  As a reference microphone for the calibration, I used a B&K 2250 sound level meter (SLM) with its 4191 microphone element.

Setup:  I performed the recordings in our single-walled acoustic test chamber in the basement of our building.  It is fairly quiet, though it is not as quiet at the lowest frequencies (125 Hz and below).  As shown in the figure at the top of this post, I put the lapel microphone and the B&K microphone very close to the Tympan's built-in PCB mic.

Device Configuration:  The Tympan was configured to record audio straight to its SD card as 32-bit floating point samples, switching automatically between the two microphones after a fixed interval of time.  It was configured with an input gain of +15dB for all recordings.  My code is on GitHub here.  The B&K SLM was configured to record its calibrated audio to its compact flash card.

Calibration:  To calibrate the microphones, I played white noise into the sound chamber.  The B&K SLM recorded the audio in calibrated units, as shown in the first plot below.  Simultaneously, the Tympan recorded the audio (through each of the two microphones) in uncalibrated units, as shown in the second plot below.  By comparing the raw Tympan levels with the calibrated B&K levels, the bottom plot shows the sensitivity of the Tympan+microphone at each frequency.


Measuring Self-Noise:  Turning off the white noise stimulation, the sound chamber was very quiet. Again, the B&K SLM and the Tympan made recordings from their microphones.  My assumption is that, especially for the Tympan, the true background noise in the sound chamber was so low that the recordings will reveal the self-noise of the microphones.

Self-Noise Expressed as SPL:  The first plot below shows the raw, uncalibrated noise levels recorded by the Tympan.  To convert these values to SPL, I need to apply the calibration data discussed above.  There's a couple ways that I could apply the calibration.  The middle plot shows the estimated SPL if I were to have calibrated the Tympan only at a 1 kHz, which is a common, simple way to calibrate a device.  Alternatively, if we use the full frequency-dependent calibration for the Tympan, the bottom plot shows the estimated SPL.  Using either calibration approach, the conclusion is the same: the Sony lapel mic has much higher self-noise than the built-in PCB mics!

The Microphone Matters!  Getting quantitative, I can summarize these spectra by applying an A-weighting curve and computing the broadband sound pressure level (ie, "dBA").  From these recordings, the Tympan + Lapel Mic has a self noise equivalent to an ambient noise level of 41-43 dBA (depending upon the calibration approach).  By contrast, the Tympan + PCB Mics show a noise level of between 27-29 dBA.  This 14 dB difference is a big!

Conclusion:  Since low self-noise is good, the Tympan's built-in PCB microphones seem to be a better choice than this Sony lapel microphone.  I look forward to trying other microphones to see if I can get even lower self-noise.

Follow-Up: What Self-Noise Should Be Expected?  After completing this post, I realized that I should have looked at the microphone datasheets to see what the manufacturers say about each microphone's self-noise.  Here's what I found:

  • For the PCB mics (SPH1642), the self-noise is not reported directly.  But, they report the signal-to-noise ratio as 65 dBA when given a 1 kHz signal at 94 dB SPL.  This means that the noise floor for the mics is (94 dB - 65 dBA) = 29 dBA.  This is exactly the value that I found, when I used the simple calibration for 1 kHz.  This gives me additional confidence in my measurement technique.
  • For the Sony lapel mic (ECM-CS10), the noise level is reported simply as "38 dB".  Presumably, this is A-weighted, but there is no more information provided.  My own value (41 dBA, for single-frequency calibration) is 3 dB higher than the datasheet value.  The cause for the difference is unknown, though the difference is modest.

Tuesday, March 14, 2017

Tympan Electronics and Its Self-Noise

After measuring the audio performance of the Teensy Audio Board (see my previous post), I felt that I needed something better.  If I wanted my open-source hearing aid ("Tympan") to sound good, I needed a quieter audio interface with a bigger dynamic range.  So, with help from friends and colleagues, I decided that we should build our own.  Today's post gives a quick overview of its design and then I'll present some measurements of its performance.  Were we successful?  Were we able to get better dynamic range?  Let's find out...


The Audio Codec is the Heart:  The picture above shows the Tympan audio interface.  The heart of the board is the audio codec at the top-center.  An audio codec is a highly-integrated chip that, among other duties, does all of the amplification and digitization of the incoming analog audio signals.  Choosing the right codec and then properly designing the circuit board around it are both key elements to achieving a low-noise design with maximum dynamic range.

Choosing an Audio Codec:  The Teensy Audio Board uses the SGTL5000 audio codec.  Presumably it was chosen because it is small, low-cost, low-power, and has a built-in headphone driver.  For my Tympan audio interface, I want all these same features, but I also want it to be quieter.  After looking at a bunch of options, and after talking with colleagues who have experience with a variety of TI parts, we chose to go with the Texas Instruments TLV320AIC3206 (product page here).  It's got many of the same features as the SGTL5000 but promises better audio performance, though at the cost of a few extra bucks per chip.  If it gets me the wider dynamic range that I want, I'll be very happy with that trade-off.

Circuit Design:  Like with the SGTL5000 on the Teensy Audio Board, the TI 3206 needs both the I2C and I2S buses to communicate with the host processor (the host processor being a Teensy 3.5 or 3.6).  Also like the Teensy Audio Board, we will run the TI 3206 in "slave" mode, where all clocking is provided by the host processor.  In other words, our connections to the TI 3206 parallel the connections used by the SGTL5000.  Therefore, in designing our Tympan circuit, the schematic for the Teensy Audio Board was a great help.  Yay for open source!  And, to continue the sharing, our own schematic is available on the Tympan GitHub here.


Software Driver:  After laying out the PCB and getting it fabricated, we had to write software to allow the Teensy and the TI 3206 to talk to each other.  Since I wanted to fit within the Teensy Audio ecosystem, we needed to write a "AudioControl" module that configures the TI 3206 to be in the proper I2S mode so that Teensy's existing I2S functions can successfully transfer audio data to and from the codec.  Luckily, I've got a buddy (Brendan, of FlexVolt fame!) who dived in and figured it all out.  His Arduino/Teensy compatible "AudioControl" module is now on the Tympan GitHub (h-file is here, cpp file is here).  Thanks, Brendan!

Measuring the Self Noise:  Once Brendan got the software side of things working [and, in the process, finding errors in the Tympan design -- we erroneously swapped "DIN" and "DOUT" by accident!  Oops!  The schematic above has been corrected.], I turned my attention to measuring the new system's audio performance.  My primary concern was the noise floor of the new hardware.  Was it better than the Teensy Audio Board?  To find out, I used a raw 3.5 mm stereo plug in the Tympan's input jack and shorted both the left and right inputs to ground.  Now, when I start recording, I should only see the Tympan's own self-noise.


Arduino Sketch:  Now I need some software to do the actual recording.  So, starting from the Arduino sketch used to record the noise for the Teensy Audio Board (here), I swapped it over to use the Tympan audio board instead of the Teensy audio board (new version here).  This sketch digitizes the input audio (which has been shorted to ground) and sends the digital samples over USB to be recorded on the PC.

Results, USB Audio:  With the inputs shorted on my Tympan board, and with me recording the audio via USB in Audacity (as discussed here), I recorded the self-noise of the Tympan.  The spectrum of the self-noise is shown below.  It's a pretty flat spectrum, which is always nice to see.  The only unexpected feature is the increase in the noise seen at the highest frequencies.   What is that?
It's a pretty nice spectrum, except for the bump up at the high frequencies.  What's that?!?
USB vs SD:  The recording above was taken via USB.  Therefore, the USB cable was attached to the Teensy/Tympan.  USB cables are notorious for injecting noise.  Frankly, I surprised that the spectrum shown above is as low and as flat as it is.  To see if the USB connection was the cause in the bump at the higher frequencies, I revised the sketch to record the audio to the Teensy's SD card instead of sending it over USB (new sketch is here),  Re-running my test, I see that the high-frequency hump is gone!  Now that's a beautifully flat spectrum...
By disconnecting the USB cable and recording the audio via SD card, the bump in the spectrum goes away.  Now the self-noise is nice and flat.  Excellent.
Noise Floor Comparison:  My primary goal for the Tympan board was to have a lower the noise floor (and thereby increase the dynamic range) than I saw with the Teensy Audio Board.  To see if I was successful, I used my recordings to compute the total self-noise across the frequency range of 125-8000 Hz. This is the frequency range most relevant for my hearing aid work.  I assessed this broadband self-noise value for the Teensy and Tympan boards across a range of analog gain settings.  The result of this noise analysis is shown in the figure below.
Apples-to-Apples:  The Teensy and Tympan boards have different ways of specifying the input gain.  Ideally, I'd be able to set the same amount of gain for each board, but that wasn't possible.  So, to  align the data in the most fair way, you can see that plot the values as function of the "maximum allowed input signal".  As expected, increasing the gain decreases the max allowed input.  So, at any given value for max allowed input, it is a fair to compare between the two systems.  As can be seen, the Tympan audio board does indeed have lower noise than the Teensy audio board.

Dynamic Range Comparison:  Another way to express this same data is to show the dynamic range of the system.  The dynamic range is the difference between the max allowed input signal and the system's noise floor.  I want as wide a dynamic range as possible, so as to better mimic the human ear.  As can be seen below, the Tympan audio board does indeed provide greater dynamic range than the Teensy audio board.  Specifically, the Tympan is getting 92.4-94.6 dB of dynamic range (in the 125-8000 Hz band) versus 80-81 dB for the Teensy Audio Board.  This is quite an improvement!
Keeping Perspective:  While I am very pleased with the performance of the TI 3206 on the Tympan audio board, it's important to remember that the Teensy audio board has some significant advantages in other areas.  First, you can go buy your own Teensy Audio Board right now, whereas you can't (yet) get a Tympan.  Second, the Teensy Audio Board is remarkably inexpensive.  It's hard to see the Tympan board ever being that inexpensive.  Yes, PJRC did a fantastic job making a good piece of hardware at a fantastic price.  That's for sure.

Next Steps:  I'm going to use the Tympan as a platform for open source hearing aid experiments.  But, a hearing aid is more than just electronics.  So, my next steps are to start adding in other elements like microphones and earphones.  And, I have to get back to making audio processing algorithms!  That's where the fun really happens!

Sunday, March 12, 2017

Teensy Audio Board Self-Noise

When working with audio, one typically wants as quiet a system as possible -- no one likes listening to hiss.  So, when I started working with the Teensy and the Teensy Audio Board, I applied a critical ear to the board's performance.  While the Teensy Audio Board was very fun, quite easy to use, and relatively inexpensive, I found that it was noisier than I like.  In this post, I'm going to illustrate the noise levels that I recorded and I'll show a workaround that helped remove a lot of that noise.


Setup:  For these tests, I used a Teensy 3.6 attached to Teensy Audio Board.  I then wrote an Arduino sketch (shared on my GitHub here) that would record audio from the line-in and send it to both the headphone output as well as to the USB Audio output.  I recorded the digital audio coming through USB using Audacity (as discussed here).  As shown in the picture above, To try to isolate just the self-noise of the system, I shorted the inputs using a jumper across the Teensy Audio Boards line-in terminals.  This should be as quiet as it can get.

First Results:  The audio that I recorded (shared here) sounded funny to my ear.  If I turned it up, I could hear a very annoying unsteady whining noise.  Looking at the spectrum (see plot below), I could clearly see some narrowband tones starting around 2 kHz.  That's right where one's hearing is most sensitive, which makes this kind of self-noise particularly problematic.  It's definitely not what you want if you're trying to make a hearing aid type of device.  What could be the cause of this?

Disable the ADC's HP Filter:  After a bunch of messing around, I finally stumbled across this post on tthe Teensy forum.   Here, "Raj" stated that the SGTL5000 audio codec (which is at the heart of the Teensy Audio Board) has a high-pass filter in its ADC.  He said that this HP filter was introducing a lot of noise and he shared the command for disabling that filter.  When I put the command "adcHighPassFilterDisable();" into my sketch and re-ran my tests, those annoying narrowband tones in the Teensy Board's self-noise went away (audio file here).  Ahhh.  That's so much better.

Varying the Gain:  The data shown above were taken with the input gain of the Teensy board set to "10" (ie, full-scale input spans 0.56 Vpp).  There are other gain settings that one could use.  So, I repeated my measurements at other gain levels to see if the input-referred self-noise was better or worse.  The results are below.

 As can be seen, the noise with the HP filter (the blue line) is noisier in all cases than when the HP filter is disabled (orange line).  So, as long as you can handle a little DC offset in your audio data, you should definitely disable that filter.

A second finding is that the apparent (input-referred) self-noise goes down as the gain increases.  So, if you have really quiet signals that you're trying to record, turning up the gain might help reveal those signals.

Dynamic Range:  The trade-off with turning up the gain is that the maximum signal level that can be recorded without clipping also goes down as the gain is increased.  For many applications, therefore, it is just as important to look at the dynamic range for the system.  The dynamic range is the difference between the maximum input level and the noise floor.  When I run the numbers for the Teensy Audio Board, I get the results below.

Here, I see that, when the HP filter is disabled (the orange line), the Teensy Audio Board has about 81 dB of dynamic range.  And, I also see that the dynamic range is basically independent of the gain setting.

Is it Good Enough?  So now we're down to the hard question:  is 81 dB of dynamic range good enough for my needs?  Well, it is a pretty decent number, especially for the price of the Teensy Audio Board.  But, for my use as part of an open-source hearing aid, where I need to amplify quiet sounds while not distorting on already-loud sounds, I think that I need a bigger dynamic range.  Normal human hearing spans on the order of 120 dB of dynamic range.  I think that I need hardware that'll get me at least a little closer to that number.

Motivation for a New Board:  The results shown here were my motivation for building the audio interface (the "Tympan") that I introduced in my last post.  In my next post, I'll share some details of that audio interface and I'll perform these same self-noise measurements to see if I was able to get a wider dynamic range.  Making wide dynamic range systems isn't easy, so it'll be exciting to find out how I did!

Follow-Up:  I measured the self-noise and dynamic range of the new Tympan board.  It's pretty good!  If you're interested, you can see the results here.