Wednesday, February 15, 2017

Faster Log10 and Pow

After my previous post, which showed a tremendous increase in speed by choosing float-specific math functions (ie, "log10f") versus their generic counterpart (ie, "log10"), I still wasn't satisfied with the speed of my audio processing on the Teensy 3.6. I had some calculations that went into and out of dB space, which means I needed to do lots of log10f(x) and pow(10,x) function calls. I needed them to be faster.  Here's how I did it...

They Should be Faster:  The figure above shows the number of CPU cycles that I measured for each math function.  The red bars are using the standard math function.  What caught my eye was that the log10f() function is slower than the logf() function.  They should only be different by one multiplication (ie, 1-2 cycles).  Similarly, I was surprised that powf(10.0,x) was so much slower than expf(x).  It seemed like I ought to be able to accelerate these functions.

Faster powf():  I started with powf() it was in the most need of acceleration.  Because I did not need a general powf() command that could do any base number, I could optimize specifically for powf(10.0,x).  Through the rules of exponential and logs, I wrote my own macro that executed pow in terms of exp:

//powf(10.f,x) is exactly exp(log(10.0f)*x)
#define pow10f(x) expf(2.302585092994046f*x)  

Note that the reformulation above is not a numerical approximation.  If you had all of the digits for that 2.302 constant, this would be an exact substitution for pow(10,x).  Yet, as you'll see in a moment, it is 3 times faster.  Way faster with no loss in accuracy.  Wow!

Faster log10f():  Similarly, for log10f(), I started with a reformulating log10 in terms of log.  While that was effective, it was only a modest increase in speed.  I wanted it even faster.  So, in a post in the ARM community forum (here), I found that someone (thanks Dr. Beckmann!) had reformulated log10f using log base 2 and then further accelerated it using an approximation for log base 2 that exploits way that single-precision numbers are represented in memory.  It's a pretty neat solution.

So, using this, my complete substitution for log10f() is shown below.  The log2 approximation function is at the end of this post.

//log10f is exactly log2(x)/log2(10.0f)
#define log10f_fast(x)  (log2f_approx(x)*0.3010299956639812f)

Because this reformulation uses an approximation for log2(), it is not an exact substitution.  But, over the range of input values that I explored, the resulting error seemed to be less than 0.05%, which is good enough for my needs.


Faster by 3x!  In looking at the speed of these to reformulated functions, I saw that my log10f approximation was 2.8x faster than the standard log10f().  Similarly, I found that my pow10f function was 3.0x faster than the standard powf(10,x) function call.  That's a pretty nice acceleration!  I'm pleased.

As promised, here's the fast log2 approximation (source):

// This is a fast approximation to log2()
// Y = C[0]*F*F*F + C[1]*F*F + C[2]*F + C[3] + E;
float log2f_approx(float X) {
  float Y, F;
  int E;

  F = frexpf(fabsf(X), &E);
  Y = 1.23149591368684f;
  Y *= F;
  Y += -4.11852516267426f;
  Y *= F;
  Y += 6.02197014179219f;
  Y *= F;
  Y += -3.13396450166353f;
  Y += E;
  return(Y);
}

Wednesday, February 8, 2017

For Speedy Float Math, Specify the Float Version

When programming up my audio processing algorithms on the Teensy 3.6, I sometimes find that the math operations are much slower than I was expecting.  Yes, some things are super-fast: arithmetic, FIR filters, FFT.  But did my code with the logarithm run so slowly?  Well, it turns out that I was using the wrong function call.  If you use the float-specific version of your function, you get tremendously faster floating-point speeds.  Don't rely on the compiler; be explicit and call it yourself!
As you can see in the graph above, I measured how long it took to complete several different math functions when using floating-point data.  The interesting part is that each math function can be called in two different ways: (1) using its generic form such as sqrt(x) or (2) using its explicitly floating-point form such as sqrtf(x).  In all cases, the explicit floating-point form was much faster.

Being a Matlab programmer, my fingers generally type out the generic form of the function.  Being naive, I had assumed that the compiler would detect my data type and automatically substitute the exact same floating-point function that I would have called myself.  Apparently, I was wrong.  Way wrong.

The table above shows that the square root function benefits the most when using the explicitly floating-point form.  The explicitly floating-point version is over 30 times faster!  The Teensy (well, every ARM M4F) has hardware acceleration for doing square roots.  I'm guessing the sqrt(x) form does not use the acceleration whereas the sqrtf(x) form does.  30x is a huge large increase in speed.

Interestingly, the logarithm and exponential/power functions do not have hardware acceleration in the Teensy.  Yet, when using the explicitly floating-point version, they see a 10x increase in speed.  Stunning.

Why are the explicitly floating-point versions so much faster?  I don't know.  But I sure as heck am going to make sure that all my future code uses them.

Tech Info: This data was measured using a Teensy 3.6 running at 180 MHz.  It was programmed from the Arduino IDE (1.6.13) via the Teensyduino (1.35) add-on.  My code is on my GitHub here.

Follow-Up:  Why is the float-specific version ("logf()") so much faster than generic version ("log()")?  I posted this to the Teensy Forum.  Their replies (here) were pretty definitive.  Under the hood, the generic version (ie, "log()") will do the calculations as double-precision floating point math, which is all in software.  By contrasts, the floating-point version ("logf()") is for single-precision floating point math, which on the Teensy is done with hardware acceleration.  That explains why the float-specific version is so much faster.

Tuesday, January 17, 2017

Basic Dynamic Range Compressor

My last post described the need for dynamic range compression in hearing aids: if you amplify enough to hear quiet sounds, loud sounds will become too loud.  One solution is to include a Dynamic Range Compressor (DRC), which changes the gain depending upon the loudness of the signal.  Because of the DRC, loud sounds will be amplified less than quiet sounds.  Perfect!  In this post, I describe how I implemented a DRC and I show its effect on some simple signals.

Algorithm Overview:  In the figure above, I illustrate the basic signal flow through my DRC algorithm.  It's a feed-forward design with a side-chain that computes the time-varying amount of gain that should be applied.  The function of each block is described below:
  • Pre-Process Signal:  In this block, I apply the "pre-gain", which is the amount of gain that will be applied when the compressor is in its linear regime.  Also in this block, I use a high-pass filter to remove any DC offset in the audio signal.
  • Level Estimator:  For the compressor to vary the gain based on the loudness of the signal, it needs to first estimate the loudness of the signal.  That's what this block does.
  • Gain Calculator: Using the estimated loudness, this block calculates how much to reduce the gain of the system.  It calculates the desired gain reduction knowing the "compression ratio" and "compression threshold" that have been supplied by the user.  It also smooths the compressed gain value through time via "attack" and "release" time constants that have been supplied by the user.
  • Apply Gain: Once the desired compressed gain value has been calculated by the side-chain, this block applies the gain to the audio signal.
Arduino/Teensy Implementation:  I implemented this algorithm as an C++ class that can be called from any Arduino or Teensy program (see AudioEffectCompressor_F32 in my GitHub library here). It is built upon my F32-extension of the Teensy Audio Library.  Because it is so reliant on floating-point operations, it is probably only appropriate for use on the Teensy 3.5 or 3.6 (which have floating-point hardware support) and not the older 3.0, 3.1, or 3.2.


Algorithm Parameters:  In the signal flow diagram below, I show the algorithm parameters that are available for the user to set.  The main tricky part is how to set the time constant for the Level Estimator.  By default, I have this value always scale itself to be 20% of the time constants that the user has set for the Gain Calculator block.  If you don't like this default behavior, you can specify your own value using the method setLevelTimeConst_sec().

Example Sketch:  As part of including this DRC algorithm in my OpenAudio_ArduinoLibrary (GitHub page here), I made sure to include an example sketch called BasicCompressor_Float.  This example code assumes that you have a Teensy Audio Board along with a Teensy 3.5/3.6.  Within the code, there are a couple of options:

  • USB Audio:  For my testing, I chose to send and receive audio over the USB link, instead of via analog audio cables.  See this post, if you want more info on how to use the Teensy's USB Audio link.  To enable USB audio in this sketch, set DO_USB to a value of one.
  • Fast or Slow:  Another choice is how to set the values for the compressor's parameters.  In my example, I have two sets of parameters.  One set gives a "fast" compressor response that is appropriate for quick limiting of very loud sounds.  The other set of values gives a "slow" response that can be used as a automatic volume control.  For my testing, I chose to use the "fast" response, as shown below.


Test Setup:  For my testing, I'm using my breadboard prototype of my Teensy Hearing Aid, which is just a Teensy 3.6 with the Teensy Audio Board (plus microphones, battery, and Bluetooth module, which are not relevant to this test).   I've got it plugged into my laptop via USB, which is also used to send and receive audio to the Teensy via the Teensy's ability to do USB Audio.  On my laptop, I'm using the Arduino IDE to set the compressor's parameters (again, I'm using the "fast" configuration) and I'm using Audacity to send the audio to the Teensy and to record the audio returned by the Teensy.


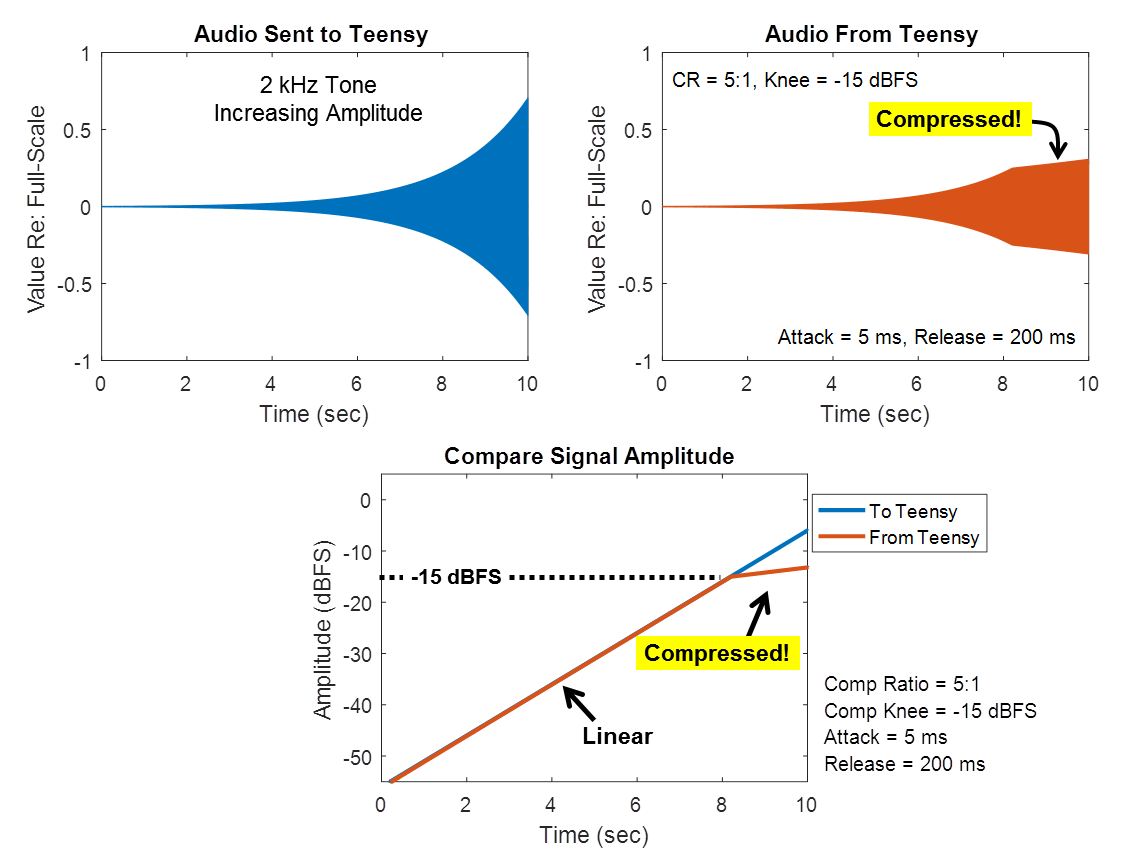
Testing, Amplitude Sweep:  For my first test, I generated a steady 2kHz tone whose amplitude increases from quiet to loud at a rate of about 6 dB/sec (my test signals are shared here).  This is the signal that I'm sending to the Teensy (also shown in blue in the figure below).  When sending this signal, the compression algorithm on the Teensy returns the signal shown in orange.  If you look at the loudest portion of the audio (starting around time = 8 seconds) the amplitude of the orange output signal looks to be squashed compared to the blue input signal.  This is the effect of the compressor!  It successfully reduced the dynamic range of the audio, as intended.

Quantifying the Response:  One important question is whether the compressor kicked in at the correct amplitude.  To answer this question, I assessed the instantaneous amplitude of each signal, as shown in the bottom plot in the figure above.  It clearly shows that the compression of the output signal begins at an amplitude that is 15 dB below full-scale.  This is exactly the value that was specified in the example code by the call to setThresh_dBFS().  It is pleasing to see that the algorithm works as intended.

Testing, Step Changes in Amplitude:  Another important question is whether the compressor is responding at the correct speed to changes in signal amplitude.  To answer this question, I generated a test signal with instantaneous step changes in amplitude, as shown in blue in the figure below.  The compressor's response is shown in orange.
Quantifying the Attack and Release:  When I extract the amplitude of each signal versus time (bottom plot), you can see that the compressor lags in its response to the step changes.  When the input signal gets louder (say, at time = 2 sec), the compressor's 5 msec "attack" time constant allows the compressor to response very quickly.  But, when the input signal gets quieter (say, at time = 3 sec), the compressor's 200 msec "release" time constant makes it respond more slowly.  In my code, these time constants are used in the traditional sense of "time constant", meaning that 63% of the change (in dB) is achieved in one time constant.  Based on the figure above, it appears that my compressor is responding at the correct speed.  I'm pleased.

Next Steps:  With the dynamic range compressor working correctly (and sounding pretty good when used with my Teensy Hearing Aid's microphones and my headphones), I'm well on my way to completing the signal processing hardware and software for a very basic hearing aid.  The main component that I'm still missing is some sort of frequency compensation to increase the gain on the frequencies that the listener needs to hear better, while reducing gain on those frequencies that the listener already hears well enough.  Stay tuned!

Follow-Up:  This algorithm converts to dB and back.  When doing the log10(x) and pow(10,x), be sure to call the correct versions and they'll run *much* faster.  Check it out here.

Saturday, January 14, 2017

The Need for Dynamic Range Compression

Sitting at an airport for any length of time, you quickly get a sense for how uncomfortable even a moderately loud environment can become.  At first, you can ignore the noise, but it quickly becomes grating and fatiguing and makes you irritable. A similar problem is faced by many hearing aid users. If you’ve got a hearing loss, how do you make quiet sounds loud enough to hear without also making already-loud sounds too uncomfortable?  For hearing aids, the answer is “dynamic range compression”.

If you have normal hearing, you can hear sounds over a wide range of loudness. To illustrate this point, the figure below shows the loudness for a few common sounds: from a whisper up to a table saw.  Quieter than a whisper, sounds start to become too quiet to hear. Around the loudness of a table saw, sounds are so loud that they become very uncomfortable (and also dangerous to your hearing). Between these two extremes, is one's usable dynamic range.  For a person with normal hearing, it might span over 100 dB.  It’s an impressive human capability.
If you have a hearing loss, you might not have this much range.  As shown in the figure below, if you have a hearing loss, your threshold for “too quiet” moves upward.  You can no longer hear hear really quiet sounds.  With a 40 dB hearing loss, you’ll likely lose the ability to hear whispering.  Worse, even normal conversation might feel quiet enough such that it requires a lot more effort to follow.  Losing the ability for easy conversation is when hearing loss really starts to affect one's quality of life.  Or, it's when you start blaming everyone for "mumbling too much".
Hearing loss is complicated, however.  It can affect your perception of quiet sounds differently than your perception of loud sounds. Your sensitivity to quiet sounds might have decreased by 40 dB, but your sensitivity to loud sounds might not have changed at all.  So, despite your hearing loss, that table saw might still feel uncomfortably loud.  The result is that your hearing loss has decreased your usable dynamic range.  You live in a narrower acoustic world.

Historically, this decreased dynamic range was a real challenge when fitting a hearing aid. If you configured a hearing aid to sufficiently amplify quiet sounds, loud sounds could end up feeling way too loud.  As an example, the figure below shows the effect of an old-fashioned linear hearing aid providing a uniform 30 dB of amplification to all sounds. As you can see, the whisper is now loud enough to be heard.  Great!  But, now look at the high end -- the uniform amplification has made the lawn mower and the table saw painfully loud.  Even a busy restaurant is perhaps loud enough to be fatiguing and difficult over time. This is very common struggle that people with hearing loss face.
One approach used by hearing aid developers to make smarter hearing aids that fully amplify quiet sounds, while providing less amplification for louder sounds.  In effect, this approach compresses the dynamic range of the sounds presented in the ear.  As a result, these are called "compression" hearing aids.  The figure below illustrates the behavior of a hearing aid configured for 30 dB of gain with a 2:1 compression ratio that is applied for any sound with an amplified volume of 70 dB.  You can clearly see the "kink" in the line where the dynamic range compression kicks in.
Because of the dynamic range compression, the whisper is loud enough to hear while the restaurant, lawn mower, and table saw stay at reasonable volumes.  This is exactly what we want!  Isn’t it great that we’ve just solved everyone’s hearing problems?

Of course, hearing loss isn’t this simple.  Dynamic range compression does not solve all of the problem of hearing loss.  But, it is a very important tool and is central to most hearing aid algorithms.  So, in a follow-up post, I’ll implement a simple dynamic range compressor for my Teensy Hearing Aid.  The compressor will be a key part of its functionality.

Oh, back to the airport.  When you’re killing time in the airport taking pictures for your blog post, it might occur to you that all of the other travelers can see you making your silly faces for “Too Quiet!” and “Too Loud!”.  Such a realization might give you the giggles.  You have been warned.

[Photo Credit: Blue Memo Productions]
Follow-Up:  I've implemented a basic dynamic range compressor.  Check it out here!

Monday, January 2, 2017

Received My First Pull Request!

After my post about my floating-point extension of the Teensy Audio Library, I received my first Pull Request!  Someone besides me is working on the library, and that is such a complement.  Thanks, @patrick-radius!


Converting Existing Blocks to F32:  For his first contributions, Patrick created AudioMixer4_F32 and AudioMultiply_F32.  His approach was to take blocks from the existing Teensy Audio Library (their GitHub is here) and create F32 versions.  Since many people are already familiar with the Teensy Audio Library, this is a great approach for quickly adding more floating-point capability to the library (and to your own project!).

Suggestions:  If you want to make your own contributions to this floating-point library, I'd be very happy to receive them.  Like Patrick, following the model of the Teensy Audio Library is a great approach.  You could follow both the conventions as well as the style of the Teensy Audio Library.  The primary convention that is different with my F32 library is that:
  • Full-scale for the floating-point algorithms is +/-1.0 instead of +/-32768.  So, if you are copying algorithms from the Teensy Audio Library, you don't need to include scale factors or gain limits with values such as 32768 or 255 or 127.
Furthermore, if you want to contribute to my library, may I suggest that you be sure to:
  • In your *.h file, include a comment block at the top that identifies the name of the class and you as the creator.  For an example of such a header, see AudioEffectGain_F32.h.
  • Once your class works, be sure to put an #include for your *,.h file into the library's overall header file: OpenAudio_ArduinoLibrary.h.  Also, add your class as a keyword in keywords.txt.
Example Sketch:  When contributing audio blocks, consider making an example sketch so that I (and others) can see how it works.  Your example sketch should go in the examples directory of this library.  

Stereo to Mono Example:  Patrick did not include an example sketch with his contributions, so I made one.  I made an example using his   My example,  MixStereoToMono_Float, uses his new AudioMixer4_F32 class to take a two-channel (ie, stereo) input and mix them into a single-channel (ie, mono) output.  By including such an example, a new person can see how to use your new audio processing block.

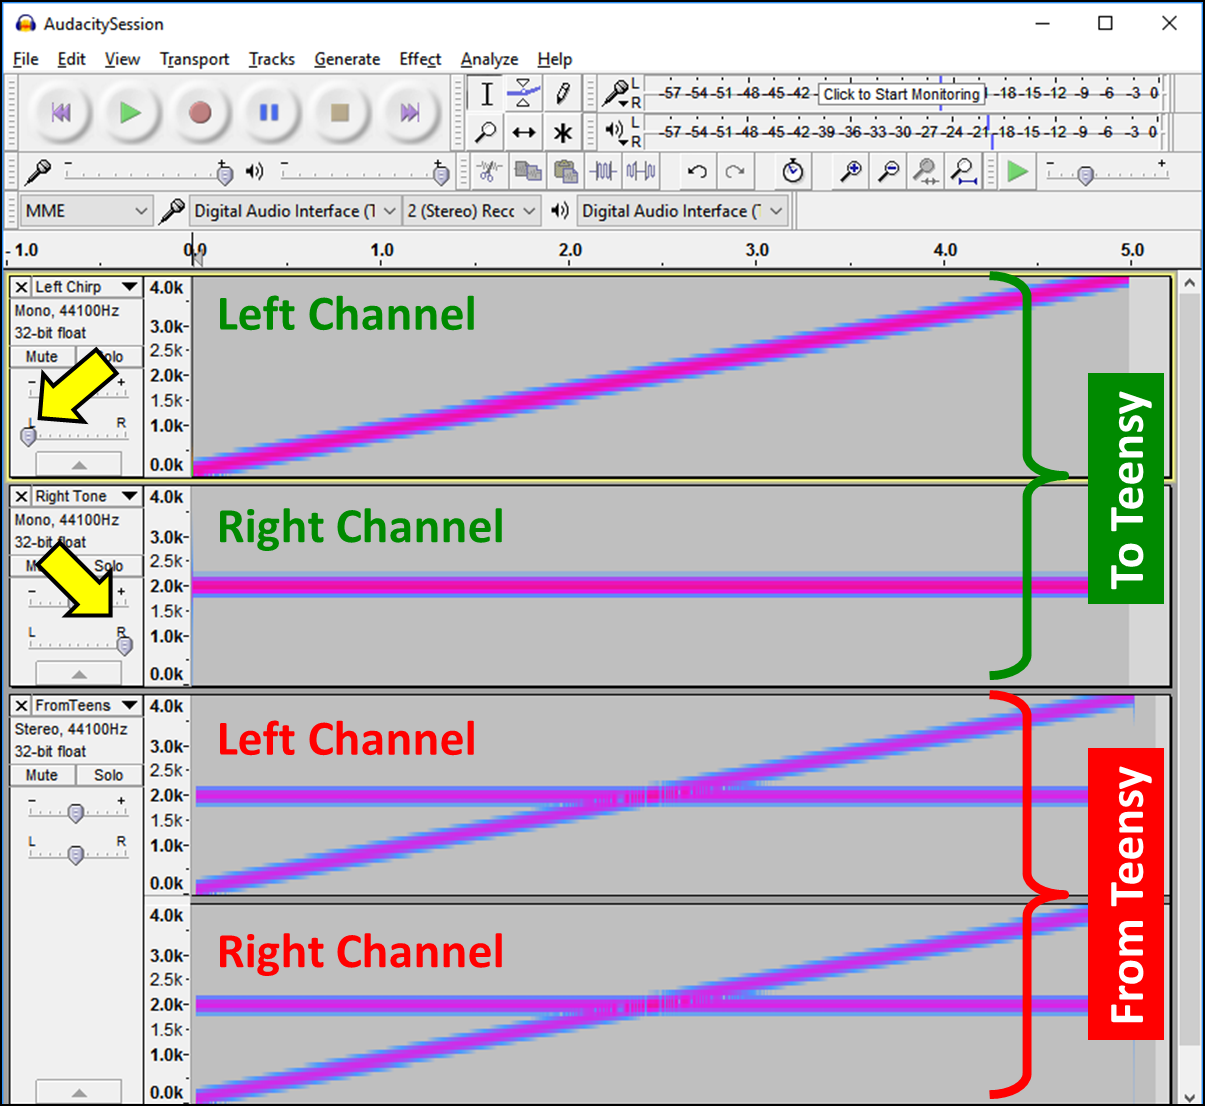
Testing Using Audacity:  To test my example sketch, I used Audacity to generate some test audio and to send the audio to my Teensy 3.6 via the Teeny's USB audio connection.  For my test audio, I created an upward sweeping chirp for the left channel and I created a steady 2 kHz tone for the right channel.  In the screenshot below, the yellow arrows point to the panning controls that I used to force my audio into the left and right channels.


Result:  Hitting the record button, Audacity played the stereo audio out to the Teensy while simultaneously recording the audio being output by the Teensy.  As you can see, the audio produced by the Teensy was the mixture of the left and right inputs.  Success!

Many Thanks:  I'm so appreciative for Patrick's high-quality contributions to this library.  Many, many thanks.  And, from him or from anyone elese, I greatly look forward to additional Pull Requests!

Sunday, December 4, 2016

Extending Teensy Audio Library for Floating-Point

For my Teensy-based hearing aid, it will be much easier to program new audio processing algorithms if I can use floating-point aido data instead of fixed-point audio data.  Unfortunately, the Teensy Audio Library assumes the use fixed-point data types (ie, Int16) for all of its processing blocks.  So, I decided to extend that library to enable the floating-point processing that I want.  Here's an overview of how I made it work.  My "OpenAudio" library is available on my GitHub here.  I'd love any feedback (or GitHub pull requests!) on how it could be done better.
Teensy Audio Library Assumes Int16:  My goal has been to maintain as much of the Teensy Audio Library's structure as possible.  But, many of the core elements of the Teensy Audio Library are deeply entwined with the assumption of fixed-point Int16 audio data.  Shown in red in the figure above are several of the foundational elements of the Teensy Audio Library that are tied to Int16 audio data.  These are the elements that I extended.

OpenAudio F32 Versions:  To enable Float32 operations, I wrote new Float32 versions of these elements.  I used inheritance where possible to reduce the duplication of functionality, particularly for the AudioStream to AudioStream_F32 conversion.  To maintain the structure and conventions of the Teensy Audio Library, I made a one-for-one replacement so that one only need to substitute the "_F32" version for the standard version.

Conversion Routines:  To interface between the Int16 data of the Teensy Audio Library and the Float32 data used my extended library, I also wrote two new "AudioConvert" classes.  In addition to converting between the Int16 and Float32 data types, these routines also re-scale the data.  The Teensy Audio Library assumes "full scale" is ±32768 whereas my floating-point objects assume that ±1.0 is full scale.  My conversion routines automatically account for this difference.

OpenAudio F32 Example:  If you download the library and unzip it into your Arduino Libraries directory (see "Installation" notes here), you can start the Arduino IDE and load an example sketch that comes with the library.  Go under the "File" menu and select "Examples", then, "OpenAudio_ArduinoLibrary", then "BasicGain_Float".


Add a New #include:  Inside this sketch, you'll see many features that are similar to every sketch that uses the Teensy Audio Library.  For example, the screenshot below shows the #include statements at the beginning of the sketch.  Note that I added an #include for the new OpenAudio library.  Once this line is added, any of the new OpenAudio classes can be used.


Instantiate the New Classes:  In a typical sketch using the Teensy Audio Library, the next block of code instantiates the audio-related objects.  The screenshot below illustrates this by invoking the standard AudioControlSGTL5000, AudioInputI2S, and AudioOutputI2S classes.   After these standard lines, I added three new lines that instantiate blocks for floating-point processing.


In this case, AudioConvert_I16toF32 will convert the standard Int16 audio data to float32.  AudioEffectGain_F32 will apply gain to the float32 audio data.  AudioConvert_F32toI16 will convert the audio data back to Int16 so that it can be output by the usual functions of the Teensy Audio Library.

New Audio Connections:  After instantiating the objects, the next step is to make the audio connections between the objects.  The screenshot below shows that a mix of standard (Int16) connections and new (Float32) connections are used to make the full processing chain.  The standard connections (AudioConnection) are used whenever the data being passed is Int16 data.  The new connections (AudioConnection_F32) are used whenever the data is float32 data.


Allocate Float32 Memory:  The last step is shown in the screenshot below.  In the setup() function is where memory is allocated for the Teensy Audio Library via the AudioMemory() statement.  Following this same pattern, I added the AudioMemory_F32() statement to allocate the float32 memory that is needed for the floating-point processing.


Complie and Run:  If you have a Teensy 3.5 or 3.6 and a Teensy Audio Board, you can compile and run this example sketch.  If you have a potentiometer attached to the Teensy Audio Board's volume control, you can use the pot to adjust the volume of the sound (well, it actually adjusts the gain applied by the new floating-point gain block).  On my hardware, it works great!  Hopefully it works well on yours, too.

Next Steps:  With the floating-point audio processing structure in-place, I can move forward with adding more "F32" processing blocks for the different functions that I need.  My next block will be a dynamic range compressor.  Then I'll probably add a filtering block.  Eventually, I'll be looking to add frequency-domain processing, which will likely involve extending my library again for a "complex_float32" data type.  That'll be even more fun!

Update:  I had my first Pull Request with a user contribution.  So awesome!
Update:  I've added an algorithms: a basic Dynamic Range Compressor.

Tuesday, November 29, 2016

Teensy Audio Board Headphone Level

For my home-brew Teensy Hearing Aid, I'm using the Teensy Audio Board as my audio interface.  The heart of the Teensy Audio Board is the Freescale SGTL5000 stereo codec.  This codec is very flexible, with lots of virtual knobs for tuning your system to suit your own application.  For my hearing aid, it is important for me to understand all settings related to loudness.  So, today, I'm going to look at the impact of the headphone volume control.


System Block Diagram:  The figure above is taken from the datasheet for the SGTL5000.  All of the blocks in yellow  are analog gain stages.  The headphone volume control is at the end of the chain, on the upper right.  It says that the headphone volume can be adjusted from -52 dB to +12 dB.

Teensy Audio Library:  Because this SGTL5000 is embedded within the Teensy Audio Board, I control it via the Teensy Audio Library.  The library hides many of the details of controlling the SGTL5000.  For example, it allows the user to control the headphone volume simply by commanding a value somewhere between 0.0 and 1.0.  Presumably, 0.0 maps to the -52 dB setting and 1.0 maps to the +12 dB setting.

Measuring the Response:  To see what this means for my system, I wrote a sketch for the Teensy that uses the Teensy Audio Library to continuously generate a nearly full-scale sine wave and to output it via the headphone jack (code is shared here).  The volume setting for the headphone output is controlled via potentiometer on the Teensy Audio Board.  To see the effect of the headphone volume setting, I measured the RMS voltage produced at the headphone jack using a Fluke handheld digital multi-meter.


Results:  The figure above shows the values that I measured.  As can be seen, the response in the middle section is linear, which is great.  At the low end, my results do deviate from linear, but that's presumably because my multi-meter had difficulty measuring such small signals (-50dBV is only 3.2 mVrms!).

Saturation:  The interesting result happens at the high end of my graph where I turn up the volume control to its highest values.  Here, my results saturate -- increasing the volume command does not increase the output voltage.  The break-over point is at a command of about 0.85.  This corresponds to an output signal level of +1.5 dBV, which is 1.2 Vrms, which is 3.4 Vpk-pk.  Since the power supply to the SGTL5000 is only 3.3V, it is not surprising that the output saturates when I ask for the output signal to be greater than the power rails.

Best Setting to Use:  Saturation will sound bad.  It will cause distortion in the audio.  To keep my hearing aid sounding good, I want to avoid this saturation.  If my full-scale sine wave causes saturation at a volume setting of 0.85, I am going to set my volume to 0.8.